Thursday, June 20, 2013

How To Make Hollyhock Dolls


My wonderful neighbor and her three darling daughters showed me how to make these little dolls! I thought they were just fabulous! It made me wish I had a daughter to share these with (even though I would never trade my son!) But I thought I would share them with all of you and your daughters, sisters, friends, nieces and neighbors! 

They are so simple to make, they would be so cute as a center piece for a little girls tea party. 


First, you (or someone you know) need a hollyhock plant that is in bloom. We cleaned off ours just to make these!


You will need one flower and one bud. The colors vary, and you can mix and match them! 


You will want to "peel" your bud. This will become the head of your little doll.


The bottom of your bud will have little holes in it. It is a bit hard to see in this picture.


You will want to make the stem of your flower pretty short, and you want to pinch off about 1/3 of the stem, this will be her neck. Then insert the "neck" into one of the holes on the bottom of the bud.


Now, you have adorable little fairy dolls. They are such a delight! I had so much fun watching my neighbor girls play together with these. They have such imagination!


Blessings! 
Ashley

The grass withers and the flowers fade, but the word of our God stands forever.
Isaiah 40:8


Thursday, June 6, 2013

This Old House

Welcome to our home! Let me tell you a little about it, and give you a tour!

I wasn't super ecstatic about moving into this house at first. It began to grow on me slowly. Then a good friend and I spent two days scrubbing every inch of this house, and I liked it a little then. I began to get really excited about this house!

Jon and I had such a peace about moving in! We knew it was what God had for us.

I went to Texas to visit my sister, and my sweet husband moved all of our things into the house! Of course I had packed most everything up before I left. When I got back I had a lot of boxes to unpack. Though Jon had tackled the kitchen, I had some rearranging to do. But that's just because I like my kitchen to "flow" a certain way. But he had it really close!

Once we had most things in their place I began to fall in love with this old house. I think I love it more and more everyday! It just fits us so well, actually it's a little large, but that just means we can grow into it! :) 

It has some odd quirks, but that's why it works so well for us. We are, after all quirky people!


The front of this old house!


This old kitchen!


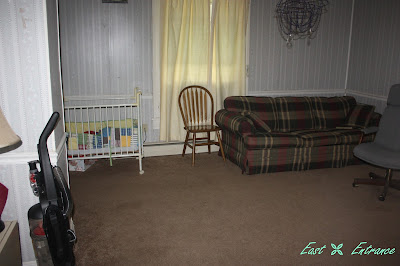
Living room. 


Bathroom... I think the pink is funny, maybe someday it can go away!


Our bedroom. The paneling will most definitely be painted ASAP!


This room has more than one function. It's earned the name "The Bumproom" because the floor it raised in the middle. It is Arrow's bedroom, our office, the guestroom (the couch is a pull out), and a place to hold my artwork that still needs to be hung. 

The upper floor is just one large open room, and one bedroom. They are being used as storage, and Jon has shell reloading equipment in the bedroom, that's his work shop. 


Blessings!
Ashley

But if serving the Lord seems undesirable to you, then choose for yourselves this day whom you will serve, whether the gods your ancestors served beyond the Euphrates, or the gods of the Amorites, in whose land you are living. But as for me and my household, we will serve the Lord.
Joshua 24:15

Thursday, May 30, 2013

Flats and Handwashing Challenge- Day 6


Today, or the 25th, is another open topic day! So, I thought I would touch on a couple of things. Which kind of come together. 

First, the simplicity of flats. All they are is a flat piece of fabric. That's it. Simple. They will fit your baby from newborn to potty training, because there are endless ways to fold them. It doesn't matter if your baby is chunky or skinny.

And second, because they are so simple it's easy to make them from things around the house.


There is your basic flat. They can be purchased at Walmarts, Targets, and just about any other place that sells cloth diapers.


Then we have your flour sack towels. They can be purchased just about anywhere that sells kitchen towels. I personally never used mine, because I only have this one, and it was hand embroidered by my great grandma... NO WAY ON EARTH I WILL EVER USE THAT AS A DIAPER!


A large or XL t-shirt with the neck and sleeves cut off, and the front and back cut apart will give you two flats. You can purchase t-shirts, well, just about anywhere!


All those receiving blankets you were given at the baby shower, use them as a flat!


I have even read of someone who cut an old towel down to size. 

So, cloth diapering doesn't have to cost you $20 + a diaper, it can be much easier on the pocket book! 

Blessings!
Ashley


Saturday, May 25, 2013

What is Working for Me?- Day 5


I want to talk about folds. There are endless ways to use a flat. One the reverse side of that there are endless things you can use as a flat... but that's not what I am talking about today, maybe tomorrow.

Just like, pockets, fitteds, AIO's and AI2's, and from brand to brand, some diapers just fit your baby better that others, and even baby to baby and your personal preference. It's all about what works for you, and your little one. That is the beauty of a flat there are so many ways to use the same flat, all you have to do is find which fold works for your baby. 

I personally LOVE the way to "jo" fold fits my baby man. None of the other folds seamed to be getting a good fit around his waist and legs. So, I thought, no big deal, I will just pad fold. Then I found the "jo" fold, and thought I would give it a try, I liked it, but I was still getting hung up on the boingos. 

Picture tutorial on the "jo" fold:


1- lay your flat on a flat surface, smooth it with your hands.
2- grab a corner, and pull to the middle, smooth the edge to make a crease 
3, 4, & 5- repeat steps two on the other corners


6 & 7- once step 5 has been completed you should have a square, tri-fold the square
8-choose an end and pull back the top layer and crease creating a wing.


9- take the next layer and fold out, crease, creating the other wing
10- fold top down to create a little "pocket" just in case poo goes up the back. this will help hold it in.
11- turn the diaper, so that the wings are at the top.
12- place baby (frog in my pics) so that the top of the diaper is about belly button height. 
13- fold the "rise" of the diaper up, and tuck the wings behind the rise.
14- pin, snappi, or boingo, the rise to the wings. 

I have boingos, at the start, I was having trouble figuring out the best way to use them, and struggling to get a good grip with them. My wiggly baby was any help there. Then I saw a picture someone who tucked the wings behind the rise, if you read one of  my previous posts I talked about this, there.


Here's my little man sitting on my beans in the garden! In his flat with our free cover!

Blessings!
Ashley


So do not fear, for I am with you; do not be dismayed, for I am your God. I will strengthen you and help you; I will uphold you with my righteous right hand.

Isaiah 41:10


Friday, May 24, 2013

Thoughts on Handwashing- Day 4


Well I missed yesterday's blog... Oops! So two post today, one now, one tonight.

Handwashing has been going well! I wash more often than I did with my pockets, because the flats have to be changed more often, and I only have 12. Yesterday, I actually ran out... Oops, again! I cut a shirt into a flat. I didn't pay attention to what the shirt was made of, but it wasn't cotton, or flannel.

My wash routine goes something like this; 


Soak- I dump my dirty flats into my tub and toss in my wet bag right along with them. I use a plunger to agitate for about 5 minutes, then let them sit for a while (this amount of time varies depending on whats going on.)
Rinse- I dump the water that the dipes have been soaking in and cover the diapers with water again, agitate for about 5 minutes, then dump.
Wash- rinsed diapers, soap, cover diapers in water, I like to stomp wash. I use a tote so there is plenty of room to stand in it. I run in place and spin in circles while running in place, I do this for about 15 minutes, dump soap water.
Rinse- I cover the diapers once more, and run in place again for about 5 minutes, then dump the water, followed by each individual diaper under the faucet.


Hang to dry. Sage-man helping me hang the diapers!
I haven't had the best line drying weather this week. I hung the flats yesterday, they were on the line for four hours, when I brought them in they were still damp. I spread them all over my love seat overnight, this morning they were finally dry. 

Blessings!
Ashley


I can do all things through Him who strengthens me.
Philippians 4:13


Wednesday, May 22, 2013

Open Topic for Flats and Handwashing Challenge- Day 3


I am enjoying this challenge. I love the simplicity of flats, I love that they aren't as bulky as a pocket or fitted. However, I think they need a doubler for just a little extra absorbency, they just don't hold much pee.


I have been having some trouble using my boingos, I couldn't quite figure out how to get the "wings" of the diaper attached well to the "rise" of the diaper. I was inspired by a picture one of my fellow challengee's posted on the Facebook support group. I prefer the jo fold, but tucking the "wings" behind the "rise" was the BEST idea EVER! 


I have washed twice. First time I used my tote in the bath tub, then decided I wanted to do it outside! So, today I moved outside with my washing, I really wish I had a hose, then I could rinse the diapers while they were hanging on the line... but that's just me. rinsing them at the spicket works just great! 


Washing diapers...


Drying diapers.. 

p.s. I love my clothes line!

Blessings!
Ashley


 Take delight in the LORD, and he will give you the desires of your heart.
Psalm 37:4 


Tuesday, May 21, 2013

Perpetration for the Flats and Handwashing Challenge- Day 2


Let me start with a note to self:
*DON'T EVER USE A WOOL COVER OVER JUST A FLAT. USE A PUL COVER/FITTED UNDER THE WOOL!*
Now, I will explain; Since Arrow started sleeping through the night, he wakes up with a fairly dry diaper. However, I like using the wool overnight. So, I decided to stick with the spirit of the challenge and use my flats through the night. I chose the "jo" fold  and put an extra flat folded up in the front just in case. When we got up this morning, I placed him standing next to his activity table while I folded a fresh flat. Well, the boingos holding the flat in place had found their way loose, I look over at him, and the cover and flats are at his ankle and he peed on the floor, it was comical, but not something I want to repeat!


For this challenge I purchased:
12 flats- $29.90 (I also received a free cover with my flats.)
2 boingos- $ 4.69


Nicki's Diapers was running a deal on Imagine Baby flats. Buy 2- 6 packs and get a free Imagine baby products. Since I only had three other PUL covers I jumped on this deal. I had sold some fitted diapers, that didn't fit my little man well, on a Facebook Diaper swap and used the money from those diapers for the flats, I also bought boingos. I spent a little extra for the cute prints, but since the money was from diapers for diapers, and it was in my paypal already, I figured, I could spring for the extra, and I still had extra!

Other supplies:
My mom had given me a couple of bummis covers that she had left over. $0.00
I had bought the wool cover when I first bought all my cloth diapers. I thought it would be a great overnight leakage protection! (I was right!) $8.00
I had also purchased a used Bright Star cover a while ago to use over a fitted diaper we use overnight. $6.00
I have a plastic storage tote I plan to use to hand wash, though I may end up just putting in my bathtub stop.


He thought it was funny at first to wear the diaper cover on his head, but then I stared to take a picture and he got mad that I wouldn't give him my camera. 

I also just had to share this adorable picture with you!


I took it but my sister Leah of Mele Photography edited it!

Blessings!
Ashley


The wisest of women builds her house, but folly with her own hands tears it down

.
Proverbs 14:1